Gear
Glass Blowing Tools and Lampworking Gear for the Torch Bench
A torch is only part of a working setup. These are the supporting pieces: gas and oxygen plumbing, safety gear, ventilation, the bench itself, shaping and bead tools, glass, and annealing. Treat this as a checklist of categories to research, not a shopping list. We deliberately do not point you at a generic marketplace search for parts like regulators and flashback devices, where the wrong item is a safety problem rather than an inconvenience. Buy those to your torch maker's stated specification.
Each item opens a short note and the guide that covers it. Setting up a bench from scratch? The setup planning checklist settles the torch, oxygen, fuel, ventilation and eyewear decisions in order, and the beginner setup cost guide prices the whole bench.
Disclosure: We are not currently part of any affiliate program and earn nothing from this page. The list below is an unpaid editorial checklist of what a station needs. If that changes, this notice changes with it.
Gear groups
Gas & connections
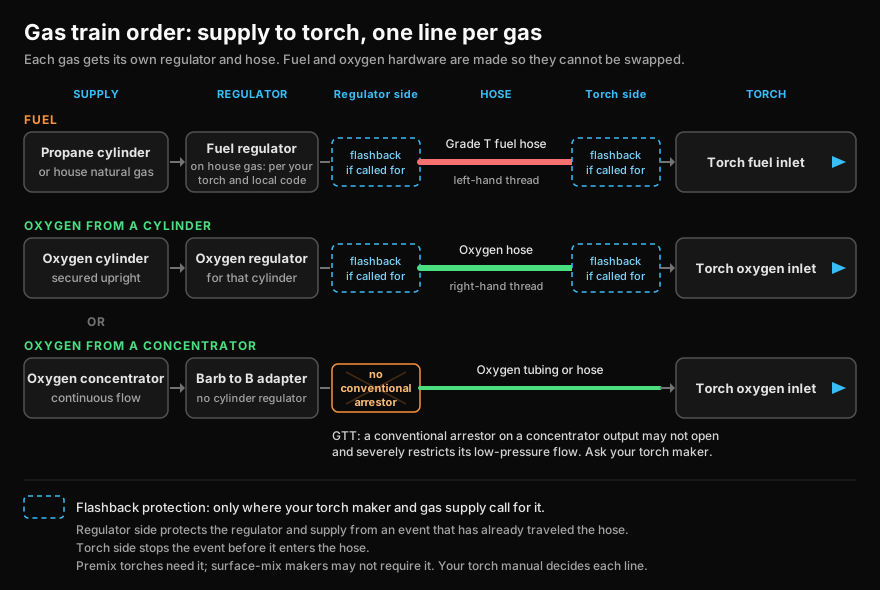
The plumbing between your fuel, oxygen, and torch. Match thread sizes (most lampworking torches use B fittings) and use grade T hose for propane or natural gas. Flashback protection is the one item here that is not a default purchase: premix torches need an arrestor, surface-mix makers may not require one, and a conventional arrestor must never go on an oxygen concentrator output. Check your torch maker first.
Oxygen regulator (CGA-540)
Each gas gets its own dedicated regulator; creep, outlet pressure rising with the torch valves closed, means service or replacement before the next session.
Buy this to your torch maker's stated specification; we do not link a marketplace search for it.
Guide: Regulator Troubleshooting: Creep, Freezing, Leaks, and Flutter
Fuel regulator (propane, or house gas where your torch needs one)
Household natural gas arrives at roughly 7 inches of water column, so whether you need a regulator or a booster is set by your torch's required fuel pressure and your local code.
Buy this to your torch maker's stated specification; we do not link a marketplace search for it.
Grade T twin welding hose
Grade T is rated for all fuel gases, which is why propane and natural gas setups use it rather than Grade R; the fuel side carries a left-hand thread so the two lines cannot be swapped.
Flashback protection (only what your torch maker specifies)
Premix torches need an arrestor, surface-mix makers may not require one, and GTT says a conventional arrestor must not go on an oxygen concentrator output, where it severely restricts flow.
Buy this to your torch maker's stated specification; we do not link a marketplace search for it.
Guide: Flashback Arrestors: Does Your Glass Torch Need Them?
Oxygen hose Y-connector / splitter
Joins two concentrators into one supply or feeds a multi-port torch; the fittings guide covers the build and its cautions.
Hose clamps
GTT's instructions secure each hose to its stud with a clamp, fuel on the red-valve stud and oxygen on the green.
Guide: Torch Mounting and Bench Angle: Fixing Your Torch Properly
Leak-test solution (oil-free soapy water)
Check every connection with an oil-free soap solution before you light, and never hunt for a leak with a flame.
Guide: Glass Torch Safety Setup: How to Build a Safe Lampworking Station
Oxygen supply
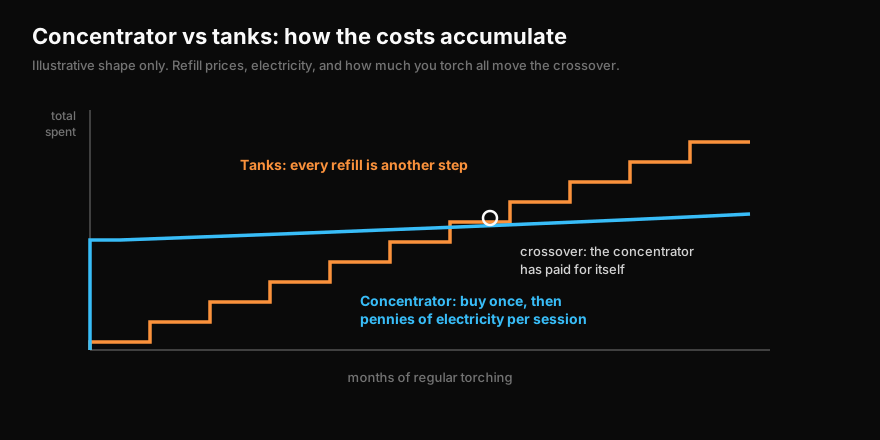
Most home lampworkers start with an oxygen concentrator rather than refilling tanks, but buy the concentrator itself from a specialist or refurbished-medical-equipment supplier, not a general marketplace. Below is the plumbing that connects it to your torch.
Oxygen concentrator (continuous flow)
Buy a continuous-flow unit, never a pulse-dose portable, and size its LPM to the torch you actually run rather than to a rule of thumb.
Buy this to your torch maker's stated specification; we do not link a marketplace search for it.
Guide: Oxygen Concentrator LPM for Lampworking: How Many You Need
Oxygen cylinder (leased, owned or exchanged)
Cylinders give high flow on demand at the cost of refills; store and use every one secured upright and chained.
Buy this to your torch maker's stated specification; we do not link a marketplace search for it.
Guide: Oxygen for Lampworking: Tanks, Suppliers, and Real Costs
Oxygen tubing & barb fittings
A concentrator usually outputs through a small hose barb, so setups often bridge it to B-fitting hardware with an adapter; confirm the exact adapter with your maker.
Safety & eyewear
Non-negotiable. Didymium filters the sodium flare for soft glass; boro work calls for boro-rated lenses. A CO detector and an extinguisher belong in every torch room.
Didymium glasses (soft glass)
Filters the sodium flare and UV from hot soft glass, but gives no infrared protection, so it is not boro eyewear on its own.
Guide: Didymium vs ACE Glasses: Which Torch Eyewear for Which Glass
Boro-rated shade glasses (shade 2, 3 or 5)
Phillips Safety sells boro lenses equivalent to welding shade 2, 3 or 5, darker as the piece, the flame and the session grow; start from the lens maker's recommendation.
Guide: What Shade Glasses for Borosilicate: Boro Torch Eyewear Explained
Fit-over or prescription filter lenses
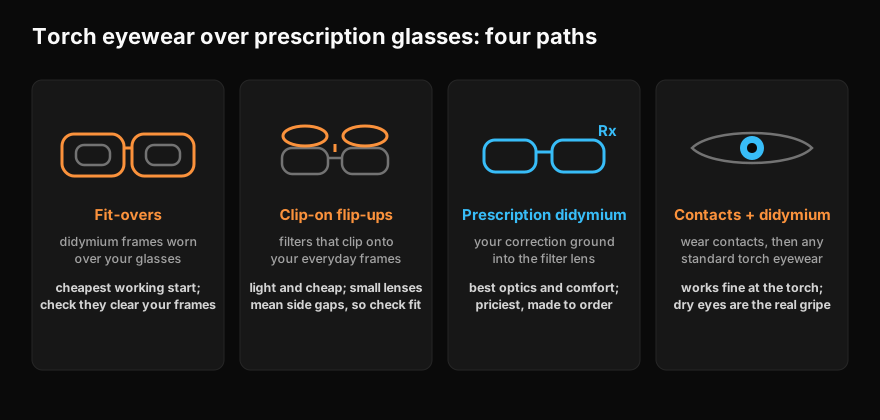
Fit-overs, clip-ons, prescription filter lenses and contacts under standard eyewear all work at the torch, each with its own trade-off in fit and cost.
Guide: Didymium Over Prescription Glasses: Fit-Overs and Clip-Ons
Impact-rated safety glasses (for crushing frit)
Crushing your own frit calls for ANSI impact-rated glasses; didymium torch glasses are for sodium flare, not impact.
Guide: Frit Application Guide: Grain Sizes, Rolling vs Sifting
N95 respirator (release and frit dust)
Dry bead release is a respirable-dust hazard, so guidance points to wet cleanup and at minimum an N95, and frit and powder handling calls for a dust mask too.
Guide: Bead Release Guide: Choosing, Applying, and Troubleshooting
Carbon monoxide detector
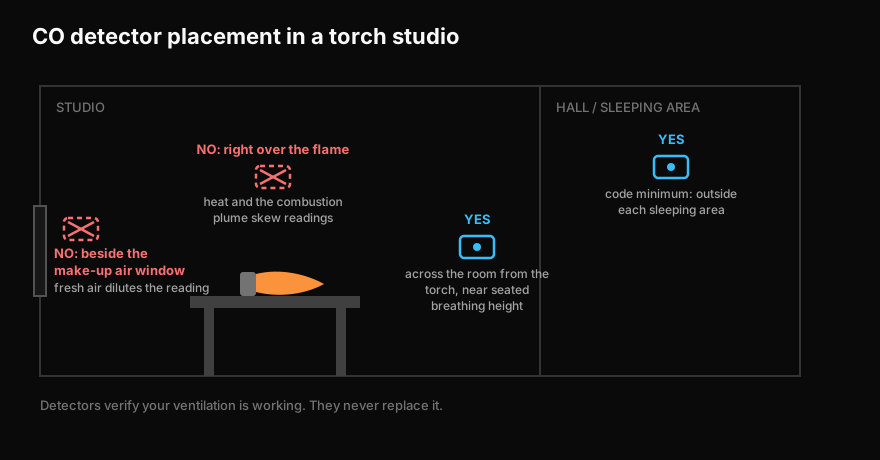
A code-minimum home alarm is designed not to sound below 70 ppm, so a torch room adds a low-level monitor with a digital readout near your breathing zone.
ABC fire extinguisher
Part of the station itself: keep it within reach of the bench, not in another room.
Guide: Glass Torch Safety Setup: How to Build a Safe Lampworking Station
Ventilation
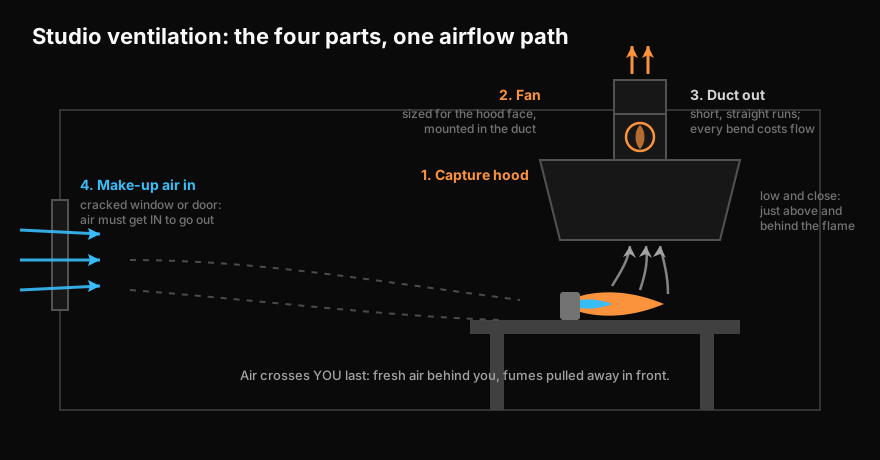
Active exhaust pulls combustion byproducts and metal-oxide fume away from your face; remember make-up air to replace what you push out. Duct size alone does not size a system: match the fan to your hood, duct run, and static pressure, then measure the installed airflow.
Capture hood
Gathers the flame's plume; it works best low and close, just above and behind the flame.
Guide: Studio Ventilation Design for Lampworking: Hood, Fan, and Duct
Inline duct fan / blower (6")
Size the fan to the real losses of your hood, duct run and static pressure, then prove the installed system with smoke.
Guide: Studio Ventilation Design for Lampworking: Hood, Fan, and Duct
Flexible ducting (6")
Keep runs short and straight and never neck the duct down in the direction of flow; every bend costs airflow.
Guide: Studio Ventilation Design for Lampworking: Hood, Fan, and Duct
Make-up air path
Replaces every cubic foot you exhaust, without starving or backdrafting a furnace or water heater.
Guide: Studio Ventilation Design for Lampworking: Hood, Fan, and Duct
Bench, mounting & ergonomics
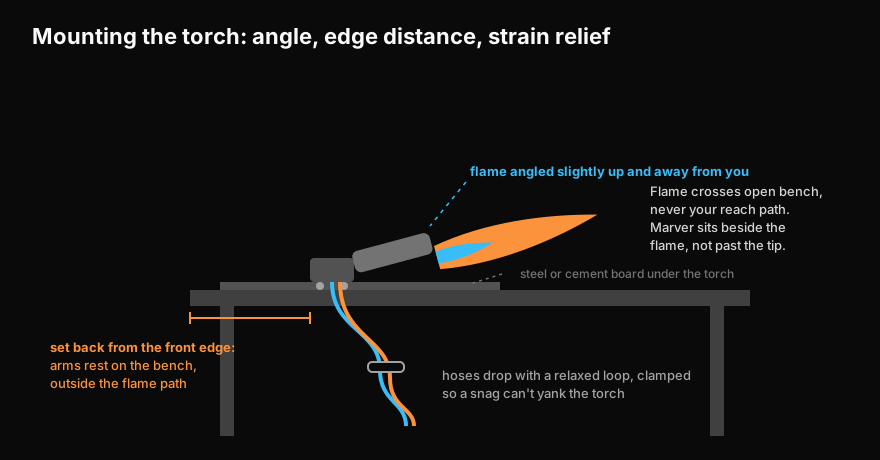
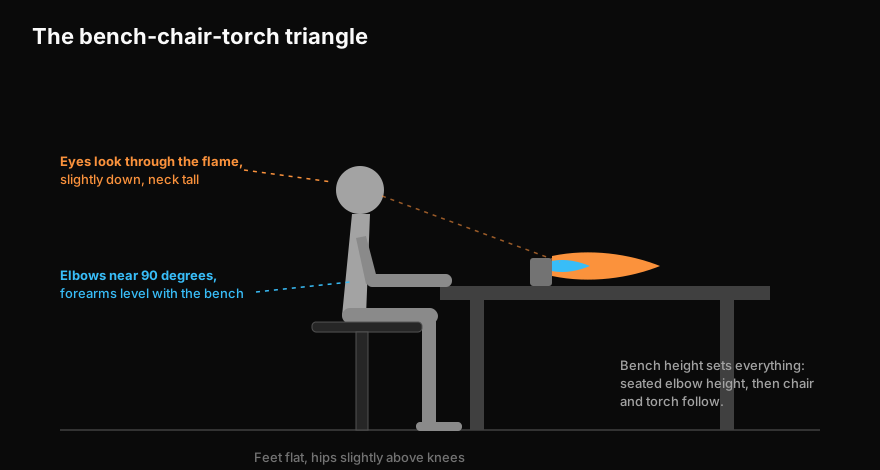
How the torch meets the table: fastened so a yanked hose cannot move it, on a surface that cannot burn, with hoses routed out of the way and a chair set to your elbows rather than to whatever table you own.
C-clamp or bolts for the torch base
GTT and Bethlehem both require the base secured by clamping or bolting; clamp while you find the spot, bolt once it has proven itself.
Guide: Torch Mounting and Bench Angle: Fixing Your Torch Properly
Cement backer board or sheet steel
A non-combustible surface over the wooden bench top, under and around the torch, with flammable materials kept well away.
Guide: Torch Mounting and Bench Angle: Fixing Your Torch Properly
Black tile in front of the torch
A dark surface under the flame makes the flame easier to read and puts a flat marvering spot right where the glass already is.
Guide: Torch Mounting and Bench Angle: Fixing Your Torch Properly
Hose strain relief (tape or C-clamp)
Takes the hoses' weight off the torch's hose studs; route the lines under the table edge, neither taut nor slack.
Guide: Torch Mounting and Bench Angle: Fixing Your Torch Properly
Adjustable chair
Adjust the chair, not the bench, until your elbows sit near 90 degrees at the flame's sweet spot with your shoulders dropped.
Guide: Ergonomics at the Torch: Bench Height, Posture, and Pacing
Shaping tools
Graphite first, metal next. A starter set of marver, paddle, reamer, rod rest and pick covers most beginner shaping; each metal tool after it adds a new technique rather than making an old one easier.
Graphite marver pad
Rolls and shapes glass while pulling heat from its surface; graphite is the default because hot glass does not stick to it.
Torch-mounted marver
Stays warm from the torch and keeps small parts warm between steps; mounts are model-specific, so confirm fit for your exact torch.
Graphite paddle
Presses, flattens and squares hot glass; flat faces are forgiving, so a mid-quality paddle is fine.
Guide: Graphite Tools Starter Set: The First Shaping Tools Worth Owning
Graphite reamer
Opens, flares and trues holes and tube ends; it spins against soft glass, so this is where fine-grain graphite earns its price.
Guide: Graphite Tools Starter Set: The First Shaping Tools Worth Owning
Rod rest
Parks hot rods and punties so they cannot roll off or scorch the bench; any stable rest works.
Guide: Graphite Tools Starter Set: The First Shaping Tools Worth Owning
Graphite rod or pick
A thin rod for poking dots, shaping details and nudging small gathers; cheap, nearly indestructible, worth owning two.
Guide: Graphite Tools Starter Set: The First Shaping Tools Worth Owning
Tungsten pick
Rakes color and bores holes; heat the tip to a white glow before it touches the glass, or the glass can stick to it.
Guide: Hand Tools Beyond the Basics: Shears, Grabbers, Presses, Picks
Tweezers (tungsten-tipped if you can)
Pointed tips grab glass better than flat ones; tungsten tips survive the flame far longer than steel and can be replaced.
Guide: Hand Tools Beyond the Basics: Shears, Grabbers, Presses, Picks
Mashers
Pressed into hot glass for flat, tabular shapes and texture; keep the piece evenly warm and press briefly to avoid thermal-shock cracks.
Guide: Hand Tools Beyond the Basics: Shears, Grabbers, Presses, Picks
Shears
Cut excess hot glass away cleanly instead of flame-cutting it, which disturbs the rest of the piece less.
Guide: Hand Tools Beyond the Basics: Shears, Grabbers, Presses, Picks
Claw grabber (hot fingers)
Holds marbles, goblet parts and sculpture you cannot punty; sizes and capacities vary by maker, so match it to your work.
Guide: Hand Tools Beyond the Basics: Shears, Grabbers, Presses, Picks
Optic mold
Patterns a gather or bubble for patterned cane, murrini or blown work; like every press, it pulls heat fast.
Guide: Hand Tools Beyond the Basics: Shears, Grabbers, Presses, Picks
Bead making
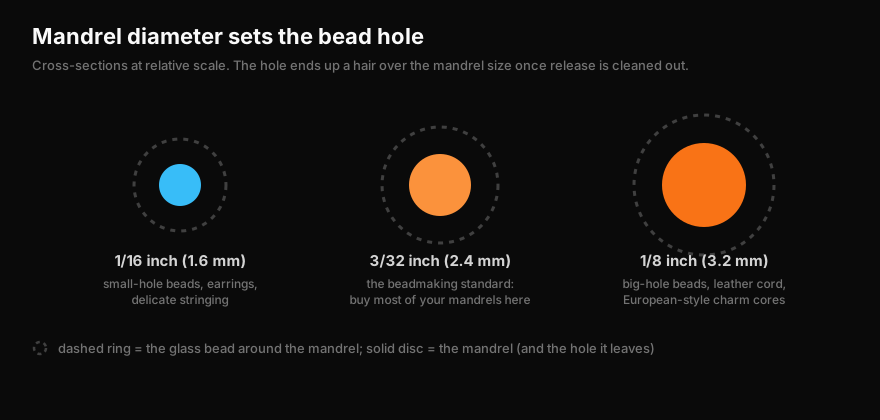
The mandrel, its coating and the tools that clean up after it. Hole size is decided here, before you light the torch.
Stainless bead mandrels
The mandrel's diameter plus the release coat sets the hole; 3/32 inch is the workhorse size, with 1/16 and 1/8 inch for small and big holes.
Guide: Mandrel Sizes and Types for Beadmaking: Diameters and Care
Bead release
A clay coating that keeps glass off the bare steel; dip vertically, pull out slowly for a thin coat, and dry it fully before the flame.
Guide: Bead Release Guide: Choosing, Applying, and Troubleshooting
Mandrel drying rack
Dipped mandrels dry standing upright, in a rack or a can of rice, and many beadmakers dip a batch the night before.
Guide: Mandrel Sizes and Types for Beadmaking: Diameters and Care
Hollow bead mandrel
A hollow-tube mandrel for blowing hollow beads, essentially a furnace blowpipe scaled down to bead size.
Guide: Mandrel Sizes and Types for Beadmaking: Diameters and Care
Bead press
Squeezes a gather into a precise, repeatable shape for matched sets; on a press, alignment is the product.
Guide: Hand Tools Beyond the Basics: Shears, Grabbers, Presses, Picks
Diamond bead reamer
Cleans release out of bead holes with the bead under water, which protects the bead, the bit and your lungs.
Guide: Bead Release Guide: Choosing, Applying, and Troubleshooting
Glass & color
The material itself. Pick a glass family first, then buy rod, tubing and frit inside it, because a matching COE number on two brands is not a compatibility guarantee.
Borosilicate glass tubing (clear)
The base for hollow boro work: points, sealed ends and blown bubbles all start from clear tubing.
Guide: Working Boro Tubing: Points, Collapse Control, and Hollow
Clear boro rod (thick)
Thick clear rod, not thick color, is how sculptors build mass; preheat it, because a thick rod plunged cold into a flame cracks.
Guide: Glass Rod Diameter: Size Chart for Boro and Soft Glass
Soft glass rods (104 COE)
Soft glass rod typically runs about 4 to 7 mm depending on brand; small rod suits beads and detail work.
Guide: Glass Rod Diameter: Size Chart for Boro and Soft Glass
Frit and powder
Grain size is the design decision: powder for smooth washes, fine for speckle, coarse for bold chips; names are not standardized, so buy by stated size.
Guide: Frit Application Guide: Grain Sizes, Rolling vs Sifting
Frit tray
Holds frit to roll a hot gather through; heat the piece only to the sticking point and build coverage in thin layers.
Guide: Frit Application Guide: Grain Sizes, Rolling vs Sifting
Annealing
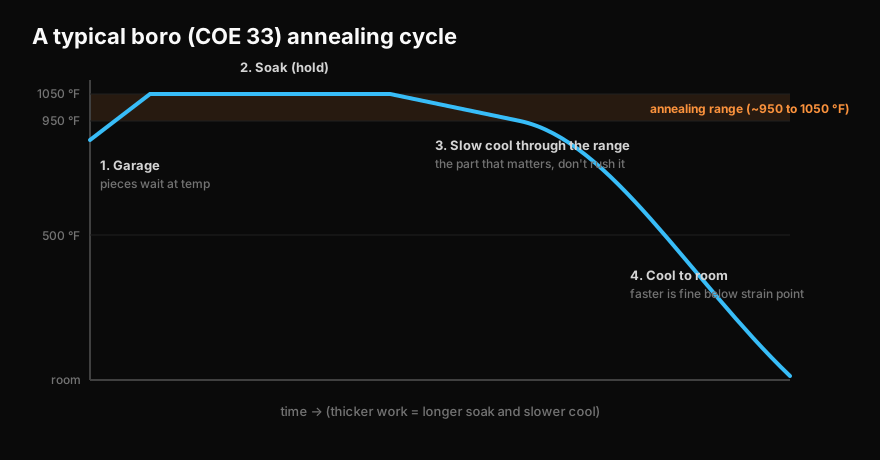
Glass that isn't annealed carries residual stress and can crack, sometimes days later. A small kiln with a digital controller lets you batch-anneal beads and small boro.
Glass annealing kiln
Fiber blanket and vermiculite only slow surface cooling; a controller-equipped kiln holds glass at its anneal point, sized to your work and your circuit.
Guide: Lampworking Kiln Guide: Choosing and Using an Annealing Kiln
Digital kiln controller
Every firing is a chain of segments (ramp rate, target, hold), and the programmed cool-down matters as much as the soak.
Specs and ratings vary by brand; always confirm thread sizes, hose grade, and oxygen output against your own torch before buying. Safety information on this site is general and not a substitute for the manufacturer's instructions or a qualified professional's advice.